Pages

Monday, September 30, 2013

What Problem?


It's the start of a new linky party over at Craftin' Desert Divas  -- "Say It With A Sentiment".  We have some AWESOME sponsors too!!! KaDoodle Bug Designs is offering $15 and The Robin's Nest is offering $10, so be sure to get your projects linked up!!!


For my project, I decided to use a stamp set that I have had for almost a year and have never used!!! I bought it specifically for the sentiment "I don't have a problem with Caffeine, I have a problem without Caffeine" - LOVE IT!!! I'm a HUGE Diet Coke lover and this sentiment is perfect!!! And although my card is based on coffee, I don't drink it, but my sister does and I will probably send this to her :) Anyway, I have put together a video for you to show how it all came together...hope you'll watch!!! My image is from the Christmas Cheer cartridge and my paper comes from Basic Grey "Paper Cottage". I used the embossing folders "Curl Ribbon" from The Paper Studio and "Birds and Swirls" from Cuttlebug. I am also linking this up over at Little Scrap Pieces.
Thanks for checking in!!!


FCCB Challenge #180 - Fall Is In The Air


This week over at FCCB we have an awesome challenge all about Fall!!!  We want to see your projects that have to do with "Fall is in the Air".  I don't know about you, but when October hits, I get so antsy to do a TON of projects for the rest of the year for fall and all the holidays.  For this challenge I wanted to do something a little different and decided to try out a Double Side Step card.  I looked on YouTube for a tutorial and found a bunch! I just picked one and gave it a go.  I knew I wanted to use the cute scarecrows from Simply Charmed and use my Peachy Keen Stamps for their faces, but that was about it.  Then I remembered on "Just Because" Cards there is a corn stalk image and it all came together!  So my scarecrows are cut at 4", I used Everyday Character Faces from PKS to make the cute faces, some flat back smooth pearls for their overall buttons, and I found some buttons in my stash for their hats.  The back row of corn stalks are cut at 7" and the rest of them are cut at 7 1/2".  I ran the yellow corn through the Swiss Dots Cuttlebug embossing folder and cut some yellow grass from Plantin Schoolbook at 3/4 inch.  The "happy fall" phrase is also from Simply Charmed.  My patterned paper is from All Seasons II 12x12 pack from Hobby Lobby.  I think it turned out pretty cute and it works great as a home decor piece too!  I hope you are able to join us this week at FCCB and link up your projects!!!

Here are the dimensions for the Double Side Step: Paper 7 1/2 x 8 1/2; With the 7 1/2" side at the top of your cutting board, set paper at the 2" mark then cut between 2 1/8" and 7 1/2".  Flip paper over and do the same thing.  Then score between cut lines at 2 1/8", 5 3/8", and 7 1/2".  Score the length of the card at 4 1/4".  I hope that makes sense!!!

Thursday, September 26, 2013

A Family Recipe


Over at Exploring Cricut they have a challenge of "What's Cooking?" and I thought it would be the perfect opportunity to make a recipe card for a friend of mine who I promised to get a recipe to.  I whipped out my From My Kitchen Cartridge (LOVE) and put this fun card together.  I used paper from DCWV Nana's Kitchen and two stamps from Fiskar's "Recipe Madness" stamp set.  I have made a video so you can find out how it all came together.  I did follow Mojo Monday's sketch and I will also be entering this into HIMCR's "LOL" challenge (Lots of Layers).  Thanks for checking in!
 

Wednesday, September 25, 2013

A Fall Pumpkin


Cricut, Create-A-Critter 2, Bic Mark-It's

So, I decided that I wanted to give "coloring" another go, but this time, instead of colored pencils, I bought a 36 marker set of Bic Mark-It's from Amazon. Let's just say, I had much more success than the first time! I found a free download of a basic pumpkin digi stamp online and figured it would be a good image to practice with. It took me a few times, but I was able to finally get it right. I also bought the Chromatix colorless blender from Michael's. The Bic colors I used were Summer Melon, Adobe Orange, and Harvest Orange. The stem was colored with Key Lime and Meadow Green. I have to admit, I do like coloring and will probably find a few more free "basic" images to continue to practice with. The rest of my 5x5 card was put together with some patterned paper from Hobby Lobby's All Seasons II 12x12 paper pack and some taupe cardstock that I embossed with the Darice embossing folder "Fall Leaf Background" from JoAnn's. "Fall" comes from Create-A-Critter 2 and I cut it out at 1". It's a very basic but festive card, I like how it turned out. I will be entering this into a couple challenges: Die Cuttin' Divas "Autumn Colors" and My Craft Spot "Pinterest Inspired".

Monday, September 23, 2013

FCCB Challenge #179 Going Places

Cricut, Just Because Cards


This week we have another awesome challenge over at FCCB. We want to see your cards, layouts, or other projects that use any mode of transportation. We also have an awesome sponsor...Bugaboo Stamps!!! For my project, I used the "Just Because" Cards cartridge and cut out the fun rocket ship at size 10. My patterned paper comes from Basic Grey "Bowties". The birthday sentiment is from a Fiskars set and the inside sentiment I printed off my computer. This card would be so fun to give to a 4 or 5 year old little boy for his birthday. I have a video to show you how it all came together. I hope you'll join us this week at FCCB, we love seeing your projects! Thanks for checking in!!!

Friday, September 20, 2013

The Color of Fall Leaves


Cricut, Celebrate with Flourish, Elegant Edges
 
I have put together another fun fall card for a few more challenges!  I followed the Mojo Monday sketch for the week, CardzTV "Colors of Fall" and An Inky Situation "Fall Leaves" challenges.  I used Celebrate with Flourish for my fun leaves and popped them up on some foam tape for added dimension.  The pattern paper used for my mats is from TPC Studio "Rustic Garden Fall Phrases" and my circle that I cut from George at 2" was from a My Mind's Eye paper pad, but I don't know the name of it because it was in my scrap stash - sorry!  I cut my scallop border from Elegant Edges at 3/4" and trimmed off the excess length, and you can't tell in the picture, but I did emboss it with The Paper Studio's "Stripes" folder.  Lastly, my ribbon is from Studio G.  Thanks for checking in!   
 

The Perfect Day...

Cricut, Cuttlebug, Celebrations, Swiss Dots, Happy Birthday, Sizzix, Elegant Edges

Here is a card I created for one of my oldest and best friends whose birthday is at the end of the month.  I followed a few challenges, of course (my favorite thing to do), to put this together.  My Craft Spot "Favorite Technique", My Creative Time "Birthday", The Scrapbooking Queen "Color Challenge", and Little Scrap Pieces "Linky Party".  This card is a clean and simple card, and I used one of my favorite techniques -Embossing! I love to find new embossing folders, but I'm a hoarder and don't use them for months after :) Anyway, I used Cuttlebug's "Happy Birthday" and "Swiss Dots" embossing folders and Sizzix's "Flowers and Bow Strings".  I was also excited to use a couple sentiments from a stamp set I won from a challenge over at My Creative Time.  "Enjoy" and "The Perfect Day" come from the "Life Is Good" stamp set, which I LOVE!  I used Celebrations for the gift image (and some scrap pattern paper), George for the circles, and Elegant Edges for the scallop border on the front.  My ribbon comes from JoAnn's.  I did take inspiration from the Mojo Monday sketch this week, but it's too far off that I'm not going to enter it in over there. I hope that my friend will enjoy this card as much as I enjoyed making it.  I also have a video for you to watch.  Thanks for checking in!!!

Cut It Up Challenge #28 - Going In Circles


Cricut, Wrap It Up, Mini Monograms, Itty Bitty Stamps, Unity Stamp Co,


Happy Friday!!! It's another start to another AWESOME challenge over at Cut It Up Challenges! We want you to start "Going In Circles" with your projects.  Load your projects up with circles and use a die cut (it can be from any machine/tool).  We have some AMAZING sponsors for this challenge too! One lucky winner will win 5 Itty Bitty stamps from Unity Stamp Company AND a $20 coupon code to As Cute As A Button!  So make sure you get your projects linked up, there is plenty of time!!!


For my project, I used the Button Bingo Itty Bitty stamp that Unity Stamp Company so graciously sent me to build a "fun and games" birthday card for a pre-teen boy.  My pattern paper all came from DoodleBug's Day to Day 6x6 paper pad that I purchased from The Royal Castle Shoppe on FB.  I used George to cut out all my circles, Mini Monograms for my letters, and Wrap It Up for my game controller and "jacks".  I also used Swiss Dots, Modern Wallpaper, and Chevron embossing folders to add some dimension to a few of my cuts.  Be sure to watch my video to get all the crafty details of my card...it was super fun to put together!!!


Wednesday, September 18, 2013

Butterfly Kisses...

Cricut, Kate's ABC's, Birthday Cards

I had so much fun making my last S Fold Card, I had to make another one!!!  They are a lot of fun to work with, so if you haven't tried, I would highly recommend it!  Anyway, I have put together another Birthday Card for my MIL to use for one of her grand-daughters.  I have used the Birthday Wishes/Butterfly Kisses sentiment before, but I think it's so cute I had to do a repeat.  The Birthday Wishes stamp comes from a TPC Birthday Stamp set and I just printed out on my computer the "and butterfly kisses".  All of my paper I used came from my scrap stash, so I will be entering this card into HIMCR's challenge of "Super Scraps Saturday".  There is also a challenge over at CardzTV to use a Jar on your project, so I will be entering this there too.  I was excited for that challenge because I have always wanted to use the jar from Kate's ABC's and just hadn't gotten around to it, so here is the fun jar full of butterflies from that cartridge.  The net on the inside of the card is also from Kate's ABC's, I just cut out the Phrase Feature for "N is for Net" and cut the image of the net away from the letters.  Hope that makes sense.  The only other tool I used was a pair of Victorian Scissors to cut around my sentiments.  I know this is more of a spring card, but it's still super cute even if it's fall right now.  Little Scrap Pieces has an anything goes linky party right now, so this will be entered over there as well.  Thanks for checking in!
 

Tuesday, September 17, 2013

Winner Winner!!!

Congratulations!!! to Carri from abusybee - DoubleClick Connections.  She is the winner of the Halloween Blog Candy from FCCB's Vinyl Blog Hop!  Please email me by Sept 24th at mollie_4200@yahoo.com with your address so I can get everything mailed out to you.

Monday, September 16, 2013

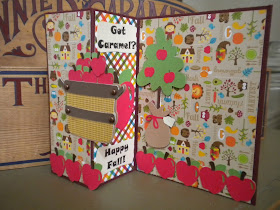
Got Caramel?


I am posting today as a guest designer for Craft It Up & Link It Up Linky Party hosted by Tara of Craftin Desert Divas! Every other Monday will mark the beginning of a new semi-weekly linky party and you could win fabulous prizes!!

This linky party theme is "Anything Autum". The sponsors are KaDoodle Bug Designs and CardzTV! The more you link up, the better chance you have to win.  Visit Craftin Desert Divas for all the rules and to play along.
Here is what I created for this linky party....
 
Cricut, Doodlecharms, Freshly Picked, Handmade Card


For my project I created an S Fold (or Z Fold) card.  The fabulous paper is from Doodlebug "Happy Harvest" that I purchased from Theresa, The Scrapbooking Queen at her Royal Castle Shoppe on FaceBook.  LOVE this paper pack! I used Doodlecharms for the apples and basket, and Freshly Picked for the apple tree on the inside.  I printed from my computer my sentiments "Got Caramel?" and "Happy Fall!"  I just LOVE caramel apples don't you?  This card is also being entered in over at Paper Playtime and Die Cuttin' Divas both themes "Apples", and BBTB2 "Fall".  I have a video for you to see how my card all came together.


Hope you will Craft It Up & Link It Up!!!

FCCB Challenge #178 - ABC's 123's


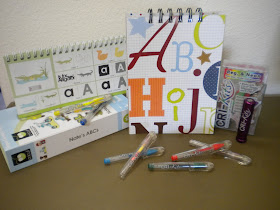
This week starts the beginning of another challenge over at FCCB! We want to see all your projects that have to do with your ABC's and 123's. For my project, I wanted to make an ABC workbook for my son who just started preschool this month. I saw an idea on Pinterest and just elaborated on it a bit. I also discovered some awesome Gel Pens that work in Cricut machines to draw images on your paper! Cri-Kits are the name of them and I think they are fabulous! I have even put a video together for you to see how they work in detail.  What's even better is that you have a chance to win a set of these amazing pens over at FCCB, so be sure to link up your projects!!!  Anyway, my project came together using the Zutter Bind-it-All, the Your Story laminating/binding machine, some paper from DCWV All About Boys mat stack, and of course the Cri-Kit Gel Pens.  Basically, I drew (with the Cri-Kits) all the ABC's upper and lower case from the Nate's ABC's cartridge (Font 2), laminated the paper they were drawn on and bound them all together to create a dry-erase workbook for my son.  Please check out my video to see this project, the pictures just weren't working :)  I used chip board for the front and back cover and used Scotch Quick Dry Adhesive to attach the fun DCWV Alphabet and Polka-Dot paper.  I am so glad that I was introduced to the Cri-Kit gel pens, the magnetic holder is ingenious and really makes a difference when drawing with your machine!  I can't wait to see what you all come up with for this challenge!!!

Thursday, September 12, 2013

Give Thanks

Cricut, Create-A-Critter 2, Leaves Embossing Folder, Tim Holtz,

I have made my first Thanksgiving card of the year! Woo Hoo!  Thanks to Die Cuttin' Divas and An Inky Situation, I was able to use the CUTE little Indian bear from Create-A-Critter 2 (cut at 3 1/2").  They both have challenges this week to use a Teddy Bear.  How fun!  Anyway, I followed the sketch from Mojo Monday this week and came up with a festive card.  I used patterned paper from Doodlebugs "Happy Harvest" that I got from The Royal Castle Shoppe on Facebook (Theresa the Scrapbooking Queen), and embossed my burgundy mat with The Paper Studio's "Leaves" embossing folder (Hobby Lobby).  I used a Recollection's small leaf punch (Michael's) for the inside of my card and inked everything up with Tim Holtz Tea Dye Distress Ink.  My sentiment comes from a Studio 112 (JoAnn's) $1 stamp set and I used some Zig Zag scissors from The Paper Studio to cut around the edges.  I also used those scissors on the inside mat.  I used foam tape on the 3x3 leaf mat on the front as well as the bear and sentiment to add some dimension.  I'm happy with how it turned out, and I have a video for you to watch how it all came together.


Wednesday, September 11, 2013

Harvest

Cricut, Country Life, Harvest Card, Elegant Edges
 
Thanks to CardzTV and HIMCR I have created another fall project! They have both issued challenges to Celebrate the Harvest and use Earthy Greens, Reds, and Yellows, respectively.  Perfect for Fall! I pulled out my Country Life cartridge which I haven't used in a while to cut out the fun corn and "HARVEST", but I didn't use the microscopic corn kernels that a couple of the layers call for, instead I whipped out my Sharpies and dotted where the paper cuts should have gone.  I also used Elegant Edges for the mat the corn cobs are on. I popped the corn up on some foam tape and tied some jute twine around them and frayed it a bit.  My pattern paper comes from an Autumn "Scrapbooking" pack that I got from my SIL, so I'm not sure where she bought it, but it was $1 for a pack of 12 12x12 sheets (as per the packaging).  Anyway, I think this card turned out festive enough for the season!

Back to School to Shape It Up...


Cricut, Wrap It Up, Shape Cards, Back to School


So here is another fun shape card from Wrap It Up, and yes, it is another back to school project! But this time I wanted to make a project for someone a little more mature and not in elementary school per se. So this card could be given to a high schooler or even someone going to college. I really like the muted colors of this card and the books shape is just fun. I cut this card at 5 1/2 inches and instead of using the layer cut for the card, I cut the layers out for the actual image, not the card function key. I used the same size and it cut the perfect size to match. Hopefully that makes sense. I used Plantin Schoolbook for the letters of the subjects and the little apples on the inside. I just cut some white card stock for the mats inside and used my new pair of Paper Studio Wavy Edge "Cloud" scissors from Hobby Lobby that I picked up for a buck! I'm going to be entering this card into BBTB2's challenge of shaped cards and Exploring Cricut's challenge of back to school. Thanks for stopping by and taking a look at my project!

Tuesday, September 10, 2013

Another Exciting Announcement!!!

 photo CDDDesignTeamMember_zpsfb3c3112.gif

I am so excited to be a part of the new Craftin' Desert Divas Design Team!!!

And here's why, look at all these AMAZING designers!!!
 
Please be sure to visit their blogs and leave them some bloggie love.


A Mermaid's crafts
Lisa @ A Mermaids Crafts
Lori @ got2bcrafting


Mayra @ Mayras Designs

Michelle @ Michelle's Cricut Fun

Emily @ Mollie's Motif


picasion
Kathy Jo @ I'm a Little Teapot...


Michelle @ Purple Monkey Moments

Shelly @ My Paper Love


One Cut Designs by Robin

Tracy @ Tracy's Cricut Corner

AND LET'S NOT FORGET OUR FEARLESS LEADER...
 
 
Craftin Desert Divas
Tara @ Craftin' Desert Divas

The new design team will be starting Oct 28th be sure to stop back to see what they come up with!!