Thursday, May 30, 2013
So Happy For You!
Here is the third wedding card I have come up with and I am entering it into the challenge Pause Dream Enjoy Challenge has issued - Use Foam Tape. Can I just say that I LOVE foam tape! Marvelous Mary over at CardzTV has been using it and mentioned she buys it at Big Lots and that it's pretty cheap. So on one of my ventures out I went in search of it. I did find it at Big Lots and it is CHEAP! I don't think I will ever by dimensionals again! It works great and one roll goes a LONG way. Thanks again Mary for another awesome tip! Anyway, I used Birthday Bash for the scallop circle shape card and mats. I used Sweethearts for the wedding couple and ran the dress and veil through the Cuttlebug Divine Swirls folder. The veil was made just by cutting out the hair in white and layering it. The couple is popped up using two thicknesses of foam tape. The patterned paper comes from My Mind's Eye 6x6 Lost and Found Madison Avenue pack. The sentiment is from the CardzTV Happy Days stamp set. I hope the happy couple will like this card!
Wednesday, May 29, 2013
No Bugs About It...
A couple weeks ago I got the Live Simply cartridge and have been anxious to use it, so when I saw the challenge issued by My Creative Time to create 4 3x3 cards featuring "critters", I was all over it. I have a friend who's birthday is coming up and I thought I would give her this set of cards. I am loving this cartridge with all the cute insects, flowers and other critters of nature. The patterned paper comes from DCWV 6x6 Kidlet Stack. I popped up the images on one thickness of foam tape and embossed the flowers, leaves, and wings (even though you can't tell in the picture). Thanks for stoppin' by and checking out my project!
Monday, May 27, 2013
FCCB Challenge #162 Memorial Day
Another fabulous challenge has begun over at FCCB. This week we are celebrating Memorial Day, so head on over and link up your project. My card is probably off the mark a little with the traditional Memorial Day cards, but it fits perfectly with how I view Memorial Day. For as long as I can remember, my dad's side of the family would gather together at our ancestors' gravesites at our local cemetaries and talk about family history. This card is representative of those memories. I also firmly believe that families are forever and that there is life beyond our journey here on this earth. I know I will see my grandparents and ancestors again. Anyway, I just love all the flowers that adorn the graves and how beautiful the cemetaries are on Memorial Day, so this is the card I came up with. I used "Just Because" Cards for the mats, tree, and stencil saying. I used SongBird for the flowers and blinged them up with some rhinestones. Hope you join us this week and I can't wait to see your projects!
Wednesday, May 22, 2013
A Bicycle Built for Two
Here is the next installment of the wedding cards I am working on. I was so glad that Die Cuttin' Divas inspired me to use a bike with this week's challenge. I thought how fun it would be to create a wedding card with a bicycle built for two! So this card was created with the Sweethearts cartridge and My Mind's Eye 6x6 Lost & Found Madison Avenue paper pack. I used Tim Holtz Tea Dye Distress Ink to ink all the edges. A fun and simple card, and I really like the message of "together". Marriage is all about working together just like riding a tandem bike. Maybe a little cheesy, but it's hard work trying to stay "in sync" sometimes, you just have to keep at it.
Tuesday, May 21, 2013
How Many Weddings In June?
June is just about upon us and as I think about it, we have 4 weddings to go to! So I need to get to work on some cards. Luckily, Mojo Monday has a fantastic sketch this week that I followed for this first card. I found an awesome 6 x 6 paper pack from DCWV "The Twinkle Glints" stack and it was 50% off at JoAnn's; so $3 later, I had what I needed to make some wedding cards. It is so shimmery and smooth, I love it. I also used some paper from Imaginisce "All Occasion" Build-A-Card Pad. I cut the tag from Elegant Edges and the scallop was cut using Spellbinders Classic Scallop Edgeabilities. I popped up the sentiment using foam tape. There are also three Recollections rhinestones, you can't really see them, but they are above the ribbon next to the tag, for a little added bling. I am also entering this card in My Craft Spot's challenge this week of using ribbon or twine.
Monday, May 20, 2013
FCCB Challenge #161 - Oh Baby!
It's another fun week over at FCCB! It's time to get the creative juices flowing for our family and/or friends who are going to be adding a little addition to their clan. Oh Baby! is this week's challenge. And it couldn't have been better timing, at least for me, there are a few friends I need to send cards to. This card was created using Birthday Bash for the base and scallop mat. It's cut at 5" so it will fit in a 5x5 envelope. The pea pod image is from New Arrival, but I don't have that cartridge, I have Best Images of 2006 and this is included on that cart. I so desperately need to order some Peachy Keen face stamps. In the right light you can see a little face on the baby that was cut, but oh my goodness, how cute would a cutie face look on this! I believe I cut the image out at 4" and I used foam tape to pop the image up. The patterned paper is from Heidi Grace Designs "BGirl Stripe". I used Mini Monograms for the smaller scallop on the inside. I hope you will join us this week for the challenge!
Thursday, May 16, 2013
Button, Button, Who's Got the Button?
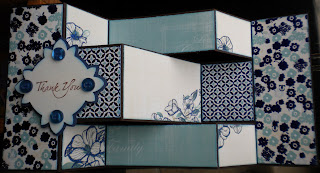
So I went a little crazy with the Tri-Shutter cards. I made a total of three, it was just a nice change from the typical A2 size. So here is the last one I made. It is another Thank You card, but you can never have too many, right? I will refer you again to Mary over at CardzTV for the awesome tutorial on the Tri-Shutter. I picked up the DCWV Juniper Berry 6x6 paper pack from Hobby Lobby when it was 50% off and I used a few different designs for this card. I have to say that the blue and flowers totally remind me of my dear grandma. She had these couches, and I swear they were the inspiration of this paper pack :) Anyway, I am going to be giving this card to my husband's aunt and uncle (they are in their 70's) and I think they will like it. The tag on the front is cut from Elegant Edges, the cut is found on page 66. I did ink around the edges with some blue ColorBox Chalk ink. I am entering this card in Paper Playtime's Challenge #10 Use Buttons or Brads.
Monday, May 13, 2013
Congratulations Graduate! FCCB Challenge #160
Monday, May 6, 2013
Is The Mojo Back?!?
Most Loved Mom
Here is my card for my dear MIL. Once again, my camera just doesn't quite capture the colors of this card, so just know that it does look really great in person. I used Celebrate with Flourish (a new cart I just got and LOVE!) for the rose, cut at 4". When my FIL was alive he would always give my MIL a single rose for special occasions, so I thought this cut would be perfect. I used Birthday Bash for the scallop card base and mat, cut at 5". BBTB2 , My Craft Spot, and CardzTV have challenges this week of creating a card for Mother's Day, so I am linking this up to those blogs. Hope you all have a wonderful Mother's Day this Sunday!
FCCB Challenge #159 - Mother's Day
Good Monday and welcome to another Fabulous Challenge over at FCCB! I can't believe that Mother's Day is this Sunday! And in honor of our mom's we have dedicated this week to them. This card I created for my own mom. She really liked the Tri-Shutter Card that I did a few weeks ago so I wanted to make one for her. If you need a tutorial on how to make one, please visit Mary at CardzTV, she does an amazing job teaching you step-by-step. Anyway, I used Create-A-Critter 2 for the bird and flowers and popped them up with some dimensionals. I also blinged them up with some rhinestones, one on the bird's hat and three for the center of the flowers. I am excited to give this card to her along with her gift; which I haven't even started, but that's another story. Hope you will play along with us this week, so swing on over to FCCB and link up your fabulous cards!
Wednesday, May 1, 2013
Decorate to Celebrate Guest Designer!!! "FOR THE GIRLS"
I am so excited to be a Guest Designer for Decorate to Celebrate's "FOR THE GIRLS" challenge. This time of year is pretty crazy for my family; we have our Anniversary, my Birthday, and Mother's Day all within 2 weeks of each other, and now we have my baby girl's birthday to throw in the mix. When I was trying to figure out what to do for this challenge I came across this amazing paper at JoAnn's, and everything just came together. I knew this paper would be perfect to center around my sweet baby Josie Jane. This is the banner I created for her and her 1st Birthday party.
I used Kate's ABC's Baby Girl Font cut at size 8". The butterflies are also from Kate's ABC's, I cut them and their shadow at 5". As far as the paper goes, it is by "me & my BiG ideas", but it doesn't have a name just a bar code (7380793379 CC-01).
The flowers are cut from Sweet Treats, I cut two at 4" and two at 3". The leaves are cut from Walk in My Garden. I cut 4 at 1 1/2" and 4 at 2". I used foam tape to pop everything up to give it more dimension and I strung it on pink and yellow ribbon. I made bows from the same ribbon and added them in between each letter using glue dots.
I love this paper so much that I had to use it for my party favors and invitations too! The treat boxes are cut from Sweet Treats. I used the Party Favors funtion key for Flower1 and cut them at 2 3/4". I used the blackout feature (same size) to cut the patterned paper flower for both sides of the box. I filled the cello bags with fun treats and tied them with ribbon.
My invitations are a two sided 5 1/2" x 4 1/4" postcard based off of the banner. The front side is pictured, the back side just has the party info on it so I didn't take a pic of it. I used the same cuts as the banner, just scaled them down, but I forgot to make note of the sizes - sorry!
Here is the dimensional view. I used foam tape to pop everything up, and just folded the butterfly wings for a 3D look.
I sure hope you are able to play along with Decorate to Celebrate's challenge. I look forward to seeing what everyone comes up with. Thanks for taking the time to visit my blog!!!
Subscribe to:
Comments (Atom)


