I am attempting to maintain a blog filled with random bits from my life and family as well as my adventures in crafting.

Showing posts with label Tags Bags Boxes & More. Show all posts

Wednesday, October 29, 2014

Decorate To Celebrate #87 - Too Cute To Spook!

Happy Wednesday!!!

Only 2 more days 'til Halloween!!!

Do you have any parties in store?
I have 2 that I am in charge of this year!
One for my son's Kindergarten class and one for
just my extended family at my house!
EEEK!!!
I've been busy!

Luckily, over at Decorate To Celebrate we are starting another
2 week Anything Goes Challenge that helped me get crackin' on
a project for one of the parties!
Hopefully you will be able to join us and show off
some of the fun projects you have been working on!

So here are the little party favor gift bags
I am putting together for all the kids in my son's class.
I wanted to keep it SUPER simple because I am making 30.
There are only 24 in the class, but I always want to make extra
just in case :)


The tag is cut from TBB&M and the ghost is from
Simply Charmed.

I used a PKS Everyday Face stamp for this cutie pie of a ghost.

The "Too Cute to Spook" sentiment comes from
Joy's Life Halloween Pun set.

The ribbon is from Michael's.

Here is a close up of the tag: 

I can't help but think of all these tags getting ripped off
and thrown away, so I always go for
Simple and Cheap :)

The bag is full of a little box of tattoos I found at Wal-Mart,
a Glow Stick, two Halloween erasers, and two Dum Dum Suckers.

Hope the kids will like them!

Thanks for checkin' in!!!

Tuesday, September 9, 2014

Craftin' Desert Divas Daily Post - Here's Some Moo-lah

Happy Tuesday!

Today over at Craftin' Desert Divas I am showcasing
one of the fun sentiments from
the "Simply Moovelous" stamp set!

Simply Moovelous

How fun is this set?!?!
You can order this set HERE.

The sentiment I am so excited to be working with
is "Here's some moo-lah"
LOVE it!!!


I created a money/gift card holder and
stamped a circle tag with this sentiment!

They are both cut from Tags, Bags, Boxes and More.

The cow is seriously improvised!
I cut it from the Best Images of 2007 Cricut Cartridge, but
it was originally on the Paper Doll Dress Up cartridge.

I cut it out twice, once in brown and once in ivory.
I then cut the face, the hooves, and the tail sections from
the ivory image and pieced it onto the brown.
I even improvised a shadow.

I inked around the edges of the pieces
and added some rosy cheeks with some chalk ink.
The mouth was also just hand cut.

The bandanna is one of the cuts meant for the cowboy doll,
but I increased the size a little bit to make it fit the cow.

My creative brain shut down after I finished this cow :)

My paper is from Echo Park This & That
and it works perfect with this country cow and
sentiment!

Added some tulle and twine at the top
and called it good! 

Here is a close up: 

SO FUN!!!

Hope you have a "Simply Moo-velous" Day!!!

I am also entering this over at the linky party

Thanks for checkin' in!


Wednesday, May 14, 2014

Decorate To Celebrate - Teacher Appreciation!

Happy Wednesday!!!
Hope this week is going well for everyone!

we have another challenge starting!
The school year is coming to a close and we want to see
how you show your appreciation for all those teachers out there!
My son is just finishing up preschool, 
so I wanted to make a treat box
for his teacher, who has done wonders for him :)

Here it is - all angles and the back...


I used Tags, Bags, Boxes and More for the Crayon Box...
I thought that was appropriate :)
I cut it out at 7".
My paper is from DCWV and my twine is from American Crafts.
The apple is cut from Plantin Schoolbook
and this is where I will stamp a fun sentiment or put her name,
I just haven't decided yet...
I think I will know what to do 
once I figure out what to put IN the box :)

I hope that you will join us for this challenge and help to inspire the rest of us!!!

Thanks for checkin' in!!!

Wednesday, April 2, 2014

Decorate To Celebrate - Easter Baskets


Happy Wednesday!!!
I hope you all survived April Fool's Day yesterday :)

Today over at Decorate To Celebrate we want to see
Easter Baskets!!!

Yup, Easter is just around the corner and it's time to start thinking of all the fun baskets you can create!
My favorite thing about Easter Baskets is what's IN the basket :)

CAVITIES!!!

Just kidding! 
But I LOVE Cadbury Mini Eggs and this year I discovered
DARK CHOCOLATE Mini Eggs
Oh Boy!!! Delicious!!!

Anyway, for my little basket I decided to make the same type of basket I did for St. Patrick's Day.
I used Tags, Bags, Boxes and More and cut the Nut Cup at 5 1/4" out of some purple card stock, then I cut the same cut at 5" out of some fun pattern paper from SEI.  I cut that into the different side sections and used my ATG to adhere them together.  I cut the cute chick from Create A Critter 2 at 2" along with the grass.  The pink bunny ears are out of some glitter paper so it adds to the cuteness, you just can't get the full effect in the pics :)  I used ribbon from American Crafts for the handle.  The sentiment was from Hobby Lobby and I used Elegant Edges to cut out the scalloped mat to stamp.  I attached the sentiment onto a craft/Popsicle stick and stood it up in the plastic grass.

Now all that's left is to fill it up with candy!!!

I hope that you will join us for this challenge,
 and remember, you can always link up Birthday projects too!

I am going to link this up over at Pause Dream Enjoy for the 3-D challenge and DLArt April Linky Party.

Thanks for checkin' in!

Wednesday, March 12, 2014

Lucky Turtle Treat Box

I was so excited to create a project for a BUNCH of challenges this week! I have put together a fun treat box for my son's preschool teacher.  I used Tags, Bags, Boxes & More and cut the Nut Cup out of some green card stock at 5 1/4".  Then I cut the same thing out of some Paper Studio pattern paper at 5" so I could cut up the sections and glue them on the sides.  I used Create A Critter 2 for the lucky turtle cut at 2" and I popped him up with some foam tape.  I embossed the shell with Swiss Dots and cut the hat and buckle out of glitter paper (can't really tell in the pic).  I also cut the shamrock (2") from Create A Critter 2, just the shadow cut on the same page as the turtle.  My stamp is from CardzTV "Happy Days" and I used Memento Tuxedo Black ink.  The ribbon is from American Crafts. Just finished it up by filling it with some "grass" and gold Hershey Nuggets. I really like how this turned out.

The challenges I am entering this into are

Thanks for checkin' in!!!

Friday, November 15, 2013

Cut It Up Challenge #32 - Countdown/Advent

 
CIU #32 Nov 15 - Due November 13, 2013
Challenge starts November 15, 2013 and ends November 27 at noon EST
Challenge: Count down! Advent calendar or
count down to any other event. Must use a die cut
 
Sponsors:
Prize:$10.00 G.C.
Sponsored by: Kadoodle Bug Designs
 
And
 

- Prize: $25.00 gift certificate
- Sponsored by: Pez-A-Doodle Designs
 
My Project:
So I have had this peg board sitting in my garage for I don't know how many years, thinking "I will use that for something someday".  Well, that day has come!!!

I first decided to Mod Podge some red and green papers onto it - SUPER EASY!!!

Put a coat of Mod Podge over the top - and YES!, there were bubbles, but after letting it sit overnight and completely dry, the paper flattened out perfectly for me!

Then it was time to get to work on the boxes!  Did you know that Tags, Bags, Boxes & More has a tree box cut?  Well, I didn't, so you can imagine my excitement when I discovered it! It was going to be PERFECT for my Advent Calendar.  So I cut out these trees at 4 1/2", assembled them and then decorated them up with the pattern paper.  The tree and star cuts are from Designer's Calendar.  I cut them out at 2 1/2" and 3/4", respectively.  The tags/numbers were also from Designer's Calendar and I cut them out at 1 1/2".  The ribbon was the .50 cent type from Michael's (I'm super cheap like that).

Cricut, Tags Bags Boxes and More, Designer's Calendar, Advent Calendar
I bought my wooden pegs at Hobby Lobby, decided not to paint them, although you easily could.  Then spaced the trees out evenly and poked the pegs through the paper.  I hot glued the pegs in the back, and they aren't going anywhere :) 
 
Here is another view of the board...

...and another
 
The boxes open from the side, and you can fit some fun small little treats or prizes for each day of the countdown.  I am super excited to put this to use in a few weeks (really, only a few weeks?) CRAZY!!!  It will be here before we know it, so I better get crackin' on filling these up!
 
I hope that after seeing all the AMAZING projects my DT Sisters have come up with at Cut It Up Challenges, you will be inspired to make a Countdown/Advent of your own AND link it up so we can see it!  This challenge will run for 12 days.  We have some awesome sponsors/gifts up for grabs too!
 
Thanks for checkin' in!!!
 

Monday, November 4, 2013

FCCB - Blog Crawl "Anything Goes"


Welcome to a Fantabulous Cricut Blog Crawl
A blog crawl is our version of a Blog hop. We are opening up a DT call, please see the FCCB blog for more information. We also have a wonderful new sponsor this week:
They are giving away a bag of crafty goodness to one lucky challenge participant.
Be sure to visit each of the Design Team members' blogs to see their projects.
If you get lost along the way, you can go back  to the FCCB blog or see the list below of all of the participating blogs.
When you are done with the crawl, go back to the FCCB blog and link up your project.
 The challenge is Anything Goes! We want to see your Cricut projects. To qualify for the weekly prize for a fabulous sponsors, you need to make sure to have at least 1 Cricut cut.

Blog Crawl List:

Cindy - Creating with the Heart
Jackie- Luv 2 Scrap
Kim - Kim's Kreations
Amy HS - The Stamping Tree
Emily - Mollie's Motif (you are here)
Heather - Scrapping Runner Creations
Lynn - My Cards n Stuff
Missy - Quick Chick Designs
Nikki - Crafty Calamities
Rebecca- Crafting Misfit
Michelle- Just a Nutter Paper Crafter
Caterina- Docerla Creations
Joneita- Create with Joneita
LB - Cool Beans by LB
Amy T - Crafting with Amy


 My Project:
My sister's birthday was last week, and last year on Pinterest I saw a funny sign that said something like "I can't remember if I'm the good sister or the evil one" so I decided to make her something along those lines.  She LOVES purple so I found some fun purple pattern paper and mod podged it to a wood plaque ($1 from Wal-Mart).  I did paint the plaque first with black acrylic paint.  I cut the letters from Lyrical Letters out of some black cardstock and adhered them with a Zig Two-Way Pen (I didn't use vinyl this time).  I put a final coat of Mod Podge over the letters, let it dry, then embellished it up with some paper flowers and bling from Michael's.  I also wanted to make a fun Gift Card holder for her and pulled out my Tags, Bags, Boxes, and More.  I cut out the purse using some solid light purple cardstock, then cut it out again using the same pattern paper as the plaque and adhered them together to make a more sturdy box.  I embellished it up with some ribbon and flat back pearls.  The tag on the front is also from TBB&M.  She loved them and was excited about the funny plaque - she actually said "Do you even have to ask? Of course, I'm the evil one."  HA HA!!!
Anyway, I hope you are having fun along the Blog Crawl! Your next stop is
 
 
Make sure and link up your projects over at FCCB when your done!!!

Monday, July 22, 2013

FCCB Challenge #170 - Fruit Salad

It's another Fabulous Challenge Me Monday over at FCCB - Fruit Salad! This week we are challenging you to create a card, project, or layout using any sort of fruit.  So get those Cricut's chirpin'!!!  Here is a video of how I went about putting my card together:
 
 
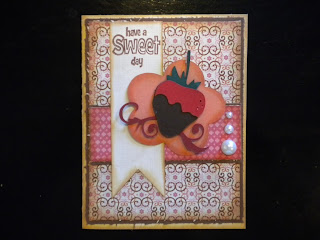
I used Celebrate with Flourish for my YUMMY! Chocolate Covered Strawberry and Mini Monograms for the flower/scallop the strawberry is popped up on. I inked the edges of my awesome new paper (My Mind's Eye Indie Chic) with some Tim Holtz Tea Dye Distress Ink. I found some flat back pearls from a Michael's $1.50 bin that worked perfectly and my sentiment, well watch the video to see how that came about :)

Cricut, Celebrate with Flourish, Mini Monograms, Tags Bags Boxes and More, Cricut Cards
 
The inside of my card I did something a little different. I have never done this before, but I made a little pocket, like you would for a mini album, and a tag from Tags, Bags, Boxes and More. There is space for another sentiment stamp on the front of the tag and the back is ready for a hand written note. You could also use the pocket for a gift card or something fun like that! I do like how this card turned out and I am excited to actually give this one away!!! (I find myself hoarding my cards - does anyone else do that?)
 
 
And because the papers and colors for this card are some of my absolute favorites, I am going to be linking it up with Whimsical Designs this week.  Hiding In My Craft Room's challenge for the week is Freestyle, and Paper Playtime's challenge is Pattern Paper, so this fits the bill for those too!